Theming / dark mode
There are two ways to customise the appearance of the component:
- CSS variables — the simplest option for colours, spacing, and icon sizes. Works everywhere, and is the recommended starting point.
- Utility classes via the
classNamesoption — for Tailwind and other utility-first frameworks, where you want to attach your own classes to our elements.
CSS variables
The core library exposes a set of CSS variables (all prefixed --iti-) that you can override on :root (or any ancestor of the input) to customise colours, spacing, and icon sizes.
Colour variables
Spacing & sizing variables
Arrow variables
Icon variables
Flag variables
Dark mode
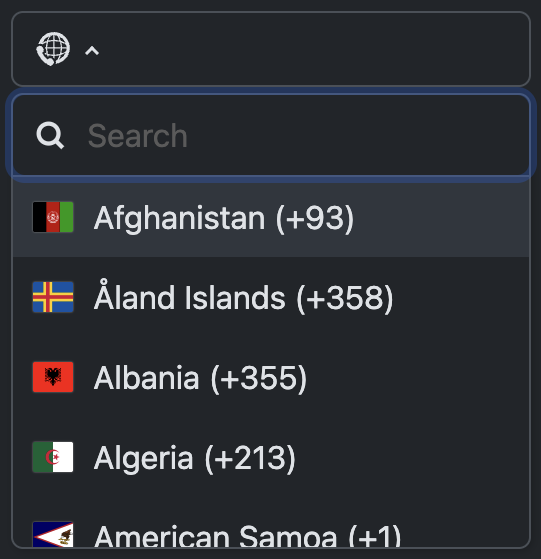
Dark mode example (with screenshot below):
@media (prefers-color-scheme: dark) {
  :root {
    --iti-border-color: #495057;
    --iti-country-selector-bg: #212529;
    --iti-icon-color: #dee2e6;
    --iti-hover-color: #30363d;
  }
}
Note
This assumes you already have your own dark mode styling in place for general body/input styling, e.g. something like this:
@media (prefers-color-scheme: dark) {
  body, input {
    color: #dee2e6;
    background-color: #212529;
  }
  input {
    border-color: #495057;
  }
  input::placeholder {
    color: #666;
  }
}
Example:
Styling with utility classes
The classNames option lets you attach your own classes to the elements we generate, keyed by slot name. This is aimed at utility-first CSS frameworks like Tailwind, where you want to style the component without writing CSS that targets our internal iti__* class names.
Pass the following as classNames:
{
  input: "rounded-lg border-gray-300",
  selectedCountry: "rounded-l-lg hover:bg-slate-100",
  countrySelector: "shadow-xl rounded-xl",
  countryListItem: "px-3 py-2",
}
Your classes are added to ours, never replacing them, so the component keeps working as normal.
Available slots
| Slot | Element |
|---|---|
container |
The injected <div class="iti"> wrapping the input and the selected country |
input |
The <input> itself |
countryContainer |
The <div> wrapping the selected country, which overlays the left of the input |
selectedCountry |
The selected country <button> (a <div> when the country selector is disabled) |
selectedCountryPrimary |
The <div> inside the selected country that gets the hover highlight |
selectedFlag |
The selected country’s flag (or globe icon) <div> |
arrow |
The dropdown arrow <div> |
selectedDialCode |
The selected country’s dial code <div> (requires separateDialCode) |
countrySelector |
The country selector <div> i.e. the dropdown or the fullscreen popup |
countrySelectorContainer |
The <div> wrapping the country selector when it’s rendered outside the main container — see below |
closeButton |
The close <button> in the corner of the fullscreen popup (does not exist for a dropdown) |
searchWrapper |
The <div> wrapping the country search input and its icons |
searchIcon |
The search (magnifying glass) icon <span> |
searchInput |
The country search <input> |
searchClear |
The clear-search <button> |
countryList |
The country list <ul> |
countryListItem |
Every country <li> in the country list |
countryListItemFlag |
The flag <div> inside every country <li> (requires showFlags) |
countryName |
The country name <span> inside every country <li> |
dialCode |
The dial code <span> inside every country name |
countryCheck |
The check icon <span> added to the currently selected country <li> |
noResults |
The “no results” message <div> |
The search slots (searchWrapper, searchIcon, searchInput, searchClear, noResults) require countrySearch to be enabled.
Unknown slot names are ignored with a console warning.
Important
Making sure your classes win
Most of our CSS rules use a single class selector, e.g. .iti__country-selector { border-radius: 3px }. A Tailwind utility like .rounded-xl has exactly the same specificity, so which one wins comes down to the order the stylesheets happen to be loaded in. If your utility classes appear to have no effect, this is why.
The reliable fix is to import our CSS into a cascade layer. Layered styles always lose to unlayered ones, and to layers declared after them, so this guarantees your classes win:
@import "intl-tel-input/styles" layer(intl-tel-input);
@import "tailwindcss";
This works for Tailwind v3 (whose utilities are unlayered) and v4 (whose utilities are in a later @layer utilities). It’s worth doing even if you don’t use classNames, as it makes all of your overrides of our styles reliable.
If you import our CSS from JavaScript (i.e. import "intl-tel-input/styles") you can’t attach a layer, so move that import into a CSS file as above.
Warning
We set a few properties as inline styles, which no class can override: padding-left on the input (to make room for the selected country), and width / height / top / bottom on the country selector (for positioning and for matchDropdownWidth). So e.g. classNames: { input: "pl-4" } will not work.
The input’s padding-left is measured from the rendered width of the selected country, so to change it, widen or narrow that element instead — via --iti-spacer-horizontal, or by adding padding to the selectedCountryPrimary slot.
Targeting state
Tailwind’s aria-* variants work directly on our markup, as we already set the relevant ARIA attributes:
{
  // highlight the currently selected country in the list
  countryListItem: "aria-selected:bg-blue-50",
  // fade the selected country while the dropdown is open
  selectedCountry: "aria-expanded:opacity-70",
}
Scaling down the flag images
The flags are rendered at a generous default size so they look crisp on high-DPI displays. If they’re too big for your design, you can shrink them in the CSS by overriding a single variable --iti-flag-width. The height is derived automatically from the 4:3 aspect ratio, and the sprite offsets scale along with it, so every flag stays aligned.
:root {
  --iti-flag-width: 16px;
}
If you need a non-4:3 box around the flag (e.g. a square placeholder), override --iti-flag-height as well.
Warning
Scaling up past the default is not recommended — the sprite is rasterised at a fixed resolution and will look soft if enlarged. To show larger flags than the default, re-generate the sprite at a higher resolution instead.